Popcorn, clusters, and bobbles, oh my! All of these stitches are close in nature, and have a similar effect, but what's the difference? Each one is typically made with a combination of five stitches. Besides yarn weight and gauge having a factor in the size of the bumps, extra stitches can be added to create more texture in each stitch. The placement of the stitches are what change the result. Follow along to learn how to create each of these three-dimensional stitches, or maybe just to brush up on your technique.
Have you ever been confused by the names of each of these stitches? I'm guilty of it myself. When creating variations of these stitches, I often label them incorrectly. The single crochet "bobble" I used for the Bobble and Chain baby blanket is actually a cluster!
So, this is my attempt at redemption for my mistake. Forgive me and accept your new knowledge with my humblest of apologies.
This tutorial will:
- Teach you the differences between the bobble, cluster, and popcorn stitches.
- Help you understand which stitch to use in your own patterns.
- Guide you with step-by-step photos of how to make each stitch.
- Show you how to use each stitch in your own patterns.
- Provide an extra lesson on the "Ball" stitch

Let's begin! Use whatever size hook and yarn will be most comfortable for you, or if you are practicing for a specific project, use the materials your pattern calls for.
I'm using the same amount of stitches for every practice piece, so if you would like to begin again for the next example, you won't have to redo your starting chain. Each piece begins and ends every row with a double crochet (chain 3 for beginning dc).
Chain 17 for the number of stitches, plus 3 for the first double crochet. Begin in the fourth (4th) chain from the hook.
Bobble stitch (bo):
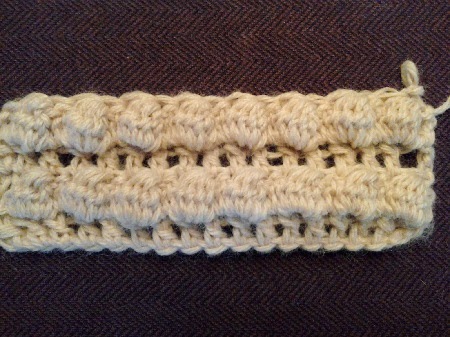
Worked all in one space, this stitch creates a nearly symmetrical bump almost like a half-sphere in your fabric. Commonly five double crochet are combined to complete the stitch; more stitches can be added for a bump with more density.
Regardless of the number used to make a bobble, it will only equal one (1) stitch when complete.
For bobbles to stand in the same direction, a return row will need to be made. A bobble can be made every row when working in the round, or in rows for a double-sided fabric.
To begin, yarn over, insert hook in next st. Yarn over, pull up a loop.

Yarn over, pull through 2 loops (1 half-closed dc).

(Yarn over, insert hook in same st, pull up a loop. Yarn over, pull through 2 loops) 4 more times


(5 half-closed dc).

Yarn over, pull through all loops on hook.

To complete the row, I made (one dc in the next st, beginning the next bobble in the following st) 7 more times, 1 dc in the last st.
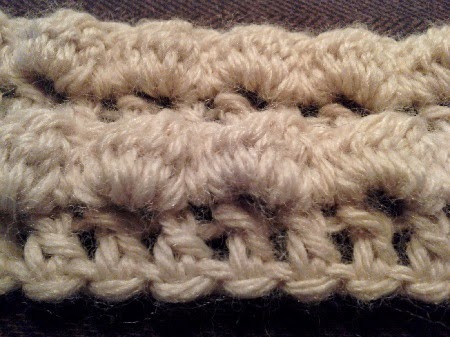

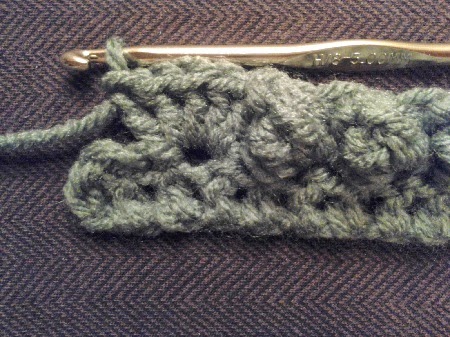
Very similar to how the bobble is made, this stitch is worked across multiple stitches, creating a triangular or teardrop-shaped raised area. Like the bobble, the cluster is usually completed with five double crochet.
This is another one-direction stitch. A return row will need to be worked, unless making a double-sided project or working in the round.
The cluster will reduce your stitch count by four (4) for each stitch made, becoming one (1) stitch when complete. To continue without a count reduction, four (4) stitches need to be added for each cluster made.
To begin: Yarn over, insert hook in next st, pull up a loop,

yarn over, pull through 2 loops (1 half-closed dc).

(Yarn over, insert hook in next st, pull up a loop, yarn over, pull through 2 loops.) 4 more times.


(5 half-closed double crochet)

Yarn over, pull through all loops on hook.

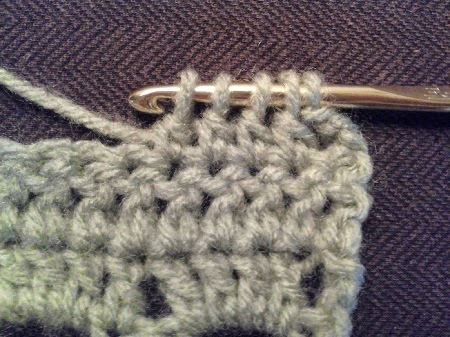
Popcorn stitch (pc):

The most versatile of all, the popcorn stitch can be worked backwards, so that it can be used every row when crocheting back and forth. This creates a bump very similar to the bobble, but with much more definition.
When worked with five (5) stitches, the three (3) middle double crochet of the stitch will be hidden, making it difficult (almost impossible) to work into. The first and last of the double crochet are workable, meaning the popcorn equals two (2) stitches.
See later how to turn this stitch into a free-standing ball by adding more double crochet.
To begin, make 5 dc in the next stitch.


Remove hook, insert in top loops of 4th st from dropped loop (first of 5 dc) from front to back.

Pick up dropped loop, pull through.

To finish the row, make one popcorn in every other stitch (skip 1, 1 pc). End with one (1) dc.
To make the stitch "pop" to the back of the fabric, after removing the hook, insert from back to front in the 4th st from dropped loop (1st of 5 dc).

Pick up dropped loop, pull through.


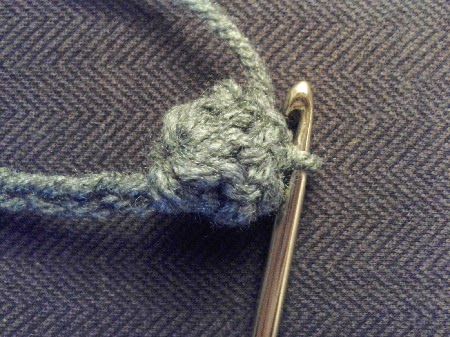
"Ball" Stitch:
I know I've seen this somewhere before, but after much searching, I still can't find a name for it, so I label it for the shape it makes. Maybe I'm not searching correctly. Maybe it really is called the "ball" stitch. Whatever it is, enjoy learning it.
This is simply the popcorn stitch made with ten (10) double crochet, then joined with a slip stitch. Use for jewelry and button making.

Chain a desired number of stitches (I made 17), plus 3 more for first double crochet.

Yarn over, double crochet in 4th chain from hook,


Make 8 more dc in same st.


Remove hook, insert in 9th stitch from hook, from back to front.

Pick up dropped loop,

pull through stitch.

Slip stitch in stitch or around post space directly across from current loop.

You can continue with the chain to create as many more as you like by repeating the steps.
OMG where have you been hiding? I have been working on a mandala wall hanging project that I had to put on hold, because I wanted to add fringe to the bottom that has crocheted beads/balls randomly added to chains. I couldn't get it to work and I couldn't find any tutorials on it. So I put the project away. Then something on Pinterest caught my eye and I ended up on your blog. Then I somehow stumbled upon this tutorial. I can't thank you enough, the mandala will live in joyous completion!!
ReplyDeleteI'm glad you found me! It always makes me happy to know I was able to help someone complete a project. Enjoy your mandala!
Delete