From bags to baskets, from hats to mats, the Rolled double crochet stitch can be used to add texture, strength, and thickness in your crochet projects. Don't confuse this stitch with the "Roll" stitch, which is also known as the "Bullion" stitch. I recently made a Guidecentral Guide for how to make the original version of the Rolled double crochet stitch, which you can view here.
Although I always tell everybody to never get discouraged, this will be difficult for beginners. If you are new to the regular double crochet stitch, or if you're still confused over turning chains and the beginning of the row, these stitches will be very challenging. Checking out the original Guide will show you more of the step by step process for creating a double crochet stitch and what the work should look like as you turn, as well as some extra pointers for what stitch to work into.
I'll be covering a condensed version of how to make the original stitch at the beginning of this tutorial. Some of you may want to check out the Guide for extra steps (*cough*...and maybe sign up with Guidecentral so you can "like" my Guides *cough*). The Guide will show you how to work double-thick and double-sided versions of this stitch into a pattern, which won't be covered here.
Anyways, this tutorial is going to show you some Rolled double crochet variations. It was difficult to work them into the Guide, but I still wanted to share them with everybody. So, let's get to it!

The original:
A regular Rolled double crochet is made by working backwards through the top of a double crochet, then into the same loops as the bottom of the stitch.
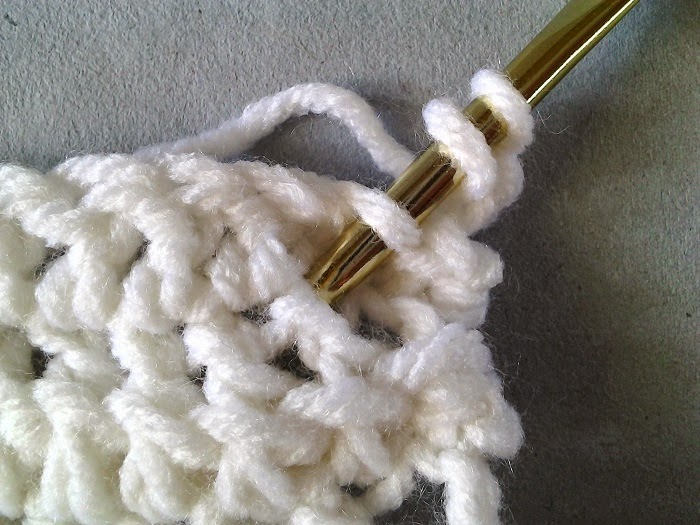
For the beginning of the row, insert the hook in the current stitch from back to front.

Insert the hook from front to back into the same loops as the bottom of the stitch.

Slip stitch, then chain 3 to count as the first double crochet.

For all other Rolled double crochet in the row, yarn over, insert hook in the next stitch from back to front.

Insert hook in the same loops as the bottom of the stitch from front to back.

When you swing your hook around to the back, it will pinch the stitch and look like this:

Complete a double crochet. For each additional stitch, the top loops of the next stitch will be pulled slightly to the front, as a ridge begins to pop up below the current row.

The texture will be entirely on the side facing you.

As a return row of regular double crochet is worked, you can see that the opposite side of the fabric is basically flat.

Variations:
For all variations, you will begin the row in the same manner as the original version, working into the designated loops for that version, instead of into the whole stitch.
Remember to yarn over for a double crochet for all other stitches in the row.
Front loops only:
Insert hook in the front loop of the next stitch from back to front.

Insert hook in the same loops as the bottom of the stitch, from front to back.

When you swing your hook around to the back, it will pinch the stitch and look like this:

Complete a double crochet.

You can see that a row of front loop rolled doubles will leave a thinner ridge with less thickness, but with more character.

As a return row of regular double crochet is worked, you can see that the back side of this stitch is still basically flat.

Back loops only:
Insert hook in back loop of next stitch from back to front.

Insert hook in the same loops as the bottom of the stitch, from front to back.
 |
Complete a double crochet.

This stitch has the same texture as the front loop version, with the unworked loops slanting in the opposite direction.

As a return row of double crochet is worked, you can see that this stitch is also flat on the back side, but with a little bit of extra texture from the unworked loops.

Compact version:
With this version, the very first stitch can be worked without a turning chain. Insert the hook directly into the bottom of the current stitch.

As you pull up a loop, don't pull up extra length. Snugly tighten the loop so that it compresses the stitch underneath it.

Complete the double crochet.

This stitch creates less of a ridge on the front side, with just some extra thickness added to the row.

As a row of return double crochet is worked, you can see this stitch adds more texture to the opposite side.

The back of this stitch still has no ridge, but more of the thickness shows on this side.

Create your own version:
Experiment with different combinations to make your own textures. Here is an example with alternating regular double crochet and rolled double crochet.

This combination I made looked a bit messy from certain angles, but I think it would look better if all the rows were worked this way. Compared with the other rows' straight-lined ridges, this texture looks out of place.

As a return row of regular double crochet is worked, you can see that the alternating combo actually has some pretty interesting character.

Backwards compact version:
I saved the most difficult for last. This version requires you to work the stitches with the yarn in front of the work.
Insert the hook from back to front in the same loops as the bottom of the current stitch. Move the yarn to the front to grab with the hook.

After you pull up a loop, keep the yarn to the front of the work.

Complete the double crochet.

This stitch looks exactly like the regular compact version, but the texture pops to the front.

Other design ideas:
There are just too many techniques you could use to make these stitches even more interesting! Imagine changing colors on the return rows so that the ridges pop out in a contrasting color...Or using beads in any of the rows...And what about weaving ribbon through the regular double crochet of the return row?

That would look beautiful on a small clutch or bag.
Or how about using surface crochet to fill in the gap of the return row with another color?

Although one-sided, this makes a super-thick fabric that would be great for hats or gloves.
With so many variations, what will you make?
Happy Crocheting!
Comments
Post a Comment
Spam sucks! Your comment will not be visible until approval. Please do not include links in your comment without permission. Thanks!